Sometimes you need to do the same procedure multiple times. QGIS 3.10 does allow you to process in batch. Nevertheless, sometimes it is easier to just run a little script that does all the work for you.
Imagine you need to import several Landsat-8 natural colour images into QGIS like we did in: Importing Landsat 8 imagery into QGIS.
To avoid clicking repetitively through our folders to collect the right files, we can make use of a python script that will allow us to call upon the function behind the Merge functionality in QGIS. The script will apply this function while looping through the folders where the input files are located. Subsequently, the output will be added to the map canvas.
We open the python console in QGIS by clicking on ![]() in the toolbar.
in the toolbar.
The python console opens below your map canvas:

We work directly in the console. Any line of code can be typed or pasted directly after the >>> in the window below.
Import packages
The first step is to load all the packages needed to run your script. A package can be seen as a directory in which modules are packed. These modules contain functions and class definitions which we use in the script.
In our case we load the following packages:
import os
import processing
from osgeo import gdal
from qgis.utils import iface
Copy and paste or type the code in the python console. The console will look like this:

To run the code, you can either hit [enter] or ![]() in the console.
in the console.
Why do we import these packages?
| packages | functionality |
| os | The os package provides functions that allows us to interact with the operating system. In our case it is used to loop through folders and retrieve paths and filenames. |
| processing | The processing package allows us to spawn a process within our python script. In our case it is used to be able to run the GDAL merge function. |
| gdal | The gdal package allows us to read, write and manipulate raster and vector geospatial data formats. In our case we apply the merge function. |
| iface | The iface package allows us to interact with the QGIS user interface. In our case we use it to add output data to the map canvas. |
Define input- and output directory
Subsequently, we define through which folder we need to loop in order to retrieve our input files and in which folder we need to save the output: the merged natural colour images.
Adjust the code by inserting the pathway to your directories and run:
dir_in = r'your\path\to\your\input\folders'
dir_out = r'your\path\to\your\output\folder'
In my case, the code looks like this:
dir_in = r'C:\Users\CMvan\Documents\QGIS_projects\input'
dir_out = r'C:\Users\CMvan\Documents\QGIS_projects\output'
Notice the r before our path string? The r is needed to indicate that the string is a raw and un-escaped string. By adding the r, the string can be read as a Windows path string.
Loop through folders and assign variables
The following section of code loops through the input directory defined as dir_in and prepares the variables needed to merge the bands together to create the natural colour image.
The module os.walk allows us to loop through the folders and collects the path of the current folder (path), makes a list of all the available (sub)folders in the input directory (name), and lists all the filenames in the current directory (fname). In each folder, except the input directory itself, we create a list (rgb_files) where we put the input files needed and we assign a name for our output raster (output_raster) and indicate the path to the output raster (path_to_raster). To easily identify our output raster, we give it the name of the folder we are in.
for path, name, fname in os.walk(dir_in):
    if path in dir_in:
        continue
    rgb_files = list()
    output_raster = path[-35:] + '_rgb.tif'
    path_to_raster = os.path.join(dir_out, output_raster)
Notice how we assign a part of the path as a name for the output raster (output_raster)? The use of path[-35:] means that we take the 35 last characters of the entire path. In this case 35 is the amount of characters making up the names of the subfolders we loop through.
Subsequently, in each subfolder, the script identifies and adds the names and path of the input files needed to the list (rgb_files). For the natural colour image we need band 4 (red), band 3 (green), and band 2 (blue).
We make use of the pattern we can identify in the filenames given by the US Geological Survey, for example:
- LC08_L1TP_204032_20191230_20200111_01_T1_B2.TIF
- LC08_L1TP_204032_20191230_20200111_01_T1_B3.TIF
- LC08_L1TP_204032_20191230_20200111_01_T1_B4.TIF
The red, green and blue bands are indicated with respectively: B4, B3 and B2.
for file in fname:
        if file.endswith('B2.TIF') or file.endswith('B3.TIF') or file.endswith('B4.TIF'):
            rgb_files.append(os.path.join(path,file))
The script puts the the files in ascending order in the list, we need them to be in descending order. This is easily solved with one line of code:
rgb_files = sorted(rgb_files, reverse = True)
Execute GDAL Merge
We gathered and sorted our input files needed, defined the name for our output. Now it is time to assign the variables needed to run the process behind the raster processing tool Merge. The input needed and the options available can be found in the QGIS documentation: GDAL algorithm provider, raster, miscellaneous, merge.
For ‘INPUT’ we use the created list with the files corresponding to band 4, band 3, and band 2. The ‘OUTPUT’ points to the path and filename created for raster_output.
parameters = { 'INPUT' : rgb_files, 'PCT' : False, 'SEPARATE' : True, 'DATA_TYPE' : 5, 'NODATA_INPUT' : None,
                   'NODATA_OUTPUT' : None, 'OPTIONS' : '', 'EXTRA' : '', 'OUTPUT' : path_to_raster  }
We call the process to execute the GDAL merge function (gdal:merge) with the parameters as defined above:
processing.run('gdal:merge', parameters)
Add to map canvas
We like to add the output immediately to the map canvas in QGIS. We call upon the QGIS interface to add the raster found on path_to_raster and give it the assigned output_raster name:
iface.addRasterLayer(path_to_raster, output_raster)
Your result should be added to the map canvas:

By applying the code directly into the console, we ran the loop only once in its entirety for the last folder. To apply the procedure to all folders, we need to import the script into the python console.
Import script into the python console
The script batch_gdal_merge_qgis.py can be retrieved from the cartosaur github account. You can find the link to the github account in the sidebar.
Do not forget to apply your own path to the input- and output directory. Also, apply the pattern to recognize your red, green, and blue band input files. Save your changes and the script is ready to run by simply dragging and dropping the .py file from the folder into the python console of QGIS.
Otherwise, you can open the editor in the python console by clicking ![]() .
.
The python console will look like this:

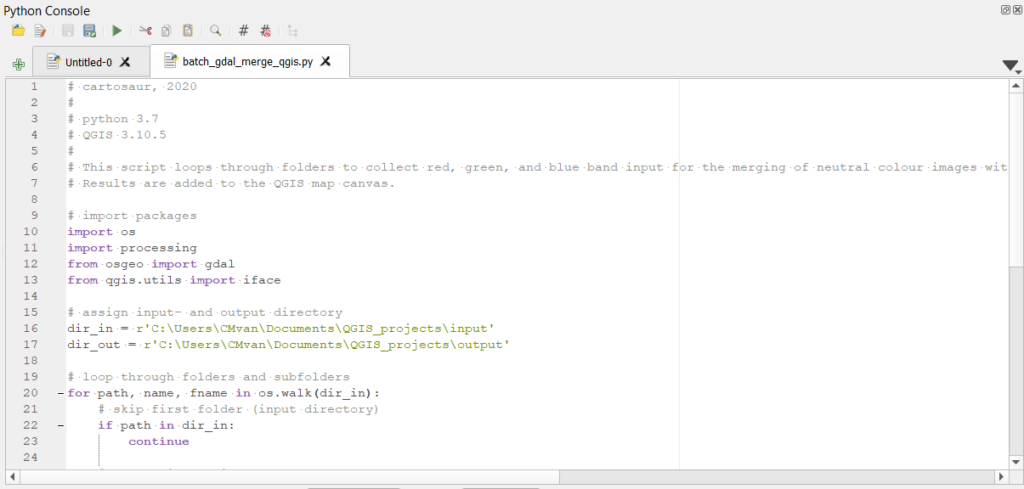
Import your python script by clicking![]() in the editor. Navigate to the folder that contains the python script, select the script and [open]. The script is imported in the editor:
in the editor. Navigate to the folder that contains the python script, select the script and [open]. The script is imported in the editor:
Click ![]() to run the script.
to run the script.
Image courtesy of the U.S. Geological Survey
Landsat-8, sensor: OLI_TIRS, path 204, row 32, date acquired: 2019-12-30
Landsat product ID: LC08_L1TP_204032_20191230_20200111_01_T1